


Just as characters and paragraphs can be formatted, document pages can also be formatted in various ways in Word. Among others, formatting pages includes setting/changing paper size, page orientation, margin, page numbers, header and footer elements, etc. It is often worth the effort spending quality time setting up or formatting document pages appropriately, because this is the only way to get a document with consistent look, carrying evidences of a professional touch. It is good practice, and often easier, to define the page settings before you begin a document. If you already know before you start a new document the particular way you want the document to look, then start by setting up the document by specifying the paper size, orientation of pages, margins, gutter, header and footer, page numbers, columns, etc. These options all affect the appearance of a page. However, if you do not know yet how the overall document should look like, you can still stick to the default page setup and change it afterward. Dividing a document into sections will enable you define varying settings or page layouts within or between pages in the document.
 |
| Fig: Page elements |
Paper Size
There are several sizes or dimensions of paper available today on which a document can be printed. Depending on the capabilities of your printer, you can print a document on common paper sizes such as A4, Letter, Legal, Tabloid, etc, or you can type dimensions for custom paper sizes. The paper size you choose will also help Word in calculating and leaving appropriate margins for the pages.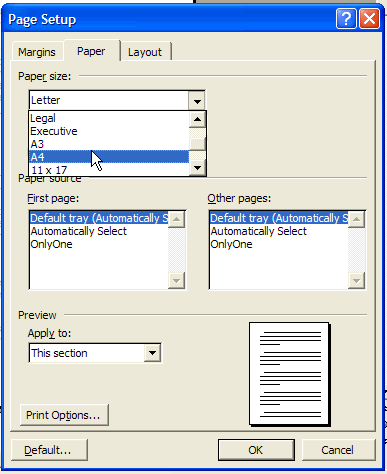 |
| Fig: Page Setup dialog showing the Paper tab page |
To set or change paper size,
- If you have already typed the document and/or you have already divided the document into sections, select the text or position the insertion point in the section for which you want to set a paper size. If you're just beginning the document, then start from step 2 below.
- On the File menu, click Page Setup.
The Page Setup dialog box is displayed. - On the Page Setup dialog box, click the Paper tab.
- In the Paper Size box, select the paper size you want, e.g. A4.
The dimension of the selected paper size is displayed in the Width and Height boxes. - In the Apply to box, select an appropriate option, such as Whole Document, Selected Sections, or This Point Forward, to determine how much of the document to be printed on the paper size you selected.
- Click OK.
TIP:
To decide about which one to choose among the options in the Apply to box, see the following table.| IF YOU CHOOSE | WORD WILL |
| Whole Document | Apply the current settings in the Page Setup dialog box to the entire document. |
| Selected sections | Apply the current settings in the Page Setup dialog box to the selected sections only, or to only the section in which the insertion point is positioned. |
| This point forward | Insert a section break before the insertion point, and the current settings in the Page Setup dialog box will be used for pages henceforth, until 'broken'. |
Page Orientation
A page can be set to portrait or landscape orientation.
Portrait Orientation makes a page stand on its shorter side, giving more vertical space, but less horizontal room. It is ideal for displaying pages with contents requiring less horizontal space.
Landscape Orientation, on the other hand, makes a page lay on its longer side, offering more horizontal room, but less vertical space. It is ideal for displaying pages with content requiring a wide horizontal space, e.g. a wide table, or a labeled image. When you change the page orientation, Word swaps the Top and Bottom margins with the Right and Left margins, respectively.
You can stick to either portrait or landscape orientation for the entire document, or you can choose different page orientations for different sections in a document.
|
|


To set/change page orientation
- For an existing document, select the text or position the insertion point in the section for which you want to set/change page orientation. For a new document, start from step 2 below.
- On the File menu, click Page Setup and then click the Margins tab in the dialog box that is appears.
- Under Orientation, click either Portrait, or Landscape.
- Choose an appropriate option in the Apply to box.
- Click OK.
Margins
In printed documents, you usually find that text appears within the page with empty spaces swathing the top, bottom, left and right edges of the paper. These empty spaces around the text within the page form the page margins. Margins determine the distance between the text and the edge of the paper. Margins are the blank area between text and the edge of the page, and also form a part of the non-text area in the page.
In Word, text and graphics are normally displayed and printed inside the margins, while headers, footers, and page numbers are displayed and printed in the margins. Setting sufficient margins for pages is vital for a document intended for printing, because not all printers can print all the way to the edge of the paper. You can quickly set/adjust the margins in a document using either the rulers, or the Page Setup dialog box . The Page Setup dialog box enable you define further options, such as gutter, and headers and footers position.

Set or adjust margins using the Page Setup dialog box
- Position the insertion point in the section whose margin you want to adjust.
- On the File menu, click Page Setup, and then click the Margins tab.
- In the Top, Bottom, Left and Right boxes, enter a desired measurement for the respective margin.
- If necessary, select other options such as Gutter, Gutter position, or Mirror margins.
See appropriate headings below for explanations on gutter and mirror margins. - Click OK.
Set or adjust margins using the ruler
The margin boundaries on the vertical and horizontal rulers are used in setting margins using the rulers. A margin boundary is the point marking the boundary/division between the gray and the white portions on the horizontal or vertical ruler. The margin boundaries are located on the far left end and on the far right end of the Horizontal Ruler, while on the Vertical Ruler, you find margin boundaries also located on the top and bottom ends. The margin boundaries on the top, bottom, left and right ends of the rulers are used to set or adjust the Top, Bottom, Left and Right margins respectively. To set margins with the ruler, you will have to display the document in either Print Preview or in Print Layout view, and also make sure that the rulers are displayed. When you move the mouse pointer over a margin boundary, the shape of the pointer changes to a double-headed arrow. It is then you can click and drag the margin boundary to one of the directions indicated by the arrows, to expand or to contract the size of that margin.
To set or adjust margins using the ruler
- Display the document in either Print Preview or Print Layout view, and make sure also that the rulers are displayed.
- Position the insertion point in the section you want to set or adjust its margin.
- Do the following:
- To set or adjust the Left margin, move the mouse pointer over the margin boundary on the left of the horizontal ruler. When the pointer changes shape to a double-headed arrow, click and drag left to decrease, or drag right to increase the Left margin.
- To set or adjust the Right margin, move the mouse pointer over the margin boundary on the right of the horizontal ruler. When the pointer changes shape to a double-headed arrow, click and drag left to increase, or drag right to decrease the Right margin.
- To set or adjust the Top margin, move the mouse pointer over the margin boundary on the top of the vertical ruler. When the shape of the mouse pointer changes to a double-headed arrow, click and drag down to increase, or drag up to decrease the Top margin.
- To set or adjust the Bottom margin, move the mouse pointer over the margin boundary on the bottom of the vertical ruler. When the shape of the mouse pointer changes to a double-headed arrow, click and drag up to increase, or drag down to decrease the Bottom margin.

TIPS:
- Hold down ALT while you drag the margin boundary to see the measurements for the margin and text area.
- Margin measurements are inversely related to text area measurements, i.e. increasing a margin decreases the text area, and vice versa.
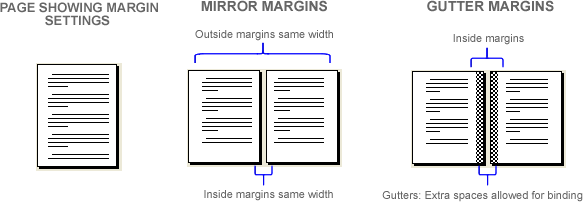
Gutter Margin
This is a margin setting that adds extra space to the side or top margin of a document intended for binding, to ensure that part of the page content closest to the binding side is not clipped off or obscured during or after binding. By default, Word is preset to leave the gutter measurement at 0". It is now up to you to set a measurement for the gutter margin as you see appropriate and when necessary. A document without a gutter margin is at the risk of having text nearest the binding edges obscured or cropped. Of course, you sure are aware that readers will definitely not like a bound document with portions of page text either clipped off or running a few inches into the inside margins. Some people tend to set higher dimensions for the left margin, on the premise that that would take care of the extra space needed for binding. I'd advise you form the habit of setting definite gutter measurements for the extra space needed at the side or top margin of the pages for documents you plan to bind.
 |
| Extra space allowed for binding |
To set gutter margins
- On the File menu, click Page Setup, and then click the Margins tab.
- In the Gutter box, enter a value for the gutter margin.
- In the Gutter position box, click Left , or Top. You should click Left, if you plan to bind the document at the left or right side or click Top, if you plan to bind the document at the top side.
- If you intend to print the document front and back of sheets, select Mirror margins in the Multiple pages list.
- Select an appropriate option in the Apply to box.
- Click OK.
 |
| Fig: Gutter positions |
Mirror Margins
When you print a document on both sides of sheets, margins of the left page are a mirror image of those on the right page. This means that when you have facing pages in a bound document, the inside margins are the same width, and the outside margins are the same width..
If you intend to print a document on the front and back sides of a sheet, then Mirror margins is an option you must choose in the Multiple pages list, in the Pages section of the Margins tab in the Page Setup dialog box. This helps ensure that the gutter margins on the front and back of a sheet are positioned on the same edge of the sheet. The position of the Left margin on the front side of a sheet becomes the position for the Right margin on the back side of the same sheet. Margins of the left page are a mirror image of those of the right page. That is, the inside margins are the same width, and the outside margins are the same width. So, if after you entered a value for the gutter margin, you choose Normal in the Multiple pages list, and you later printed the document on the front and back sides of a sheet, the gutter margin can only prevent text from being obscured on only one side of the page, but not on the other side of it. So, for a document you plan to print on both sides of sheets, always make sure to choose Mirror margins to help position gutter margins at the same edge on both sides of the sheets.

To set mirror margins for facing pagesIf you intend to print a document on the front and back sides of a sheet, then Mirror margins is an option you must choose in the Multiple pages list, in the Pages section of the Margins tab in the Page Setup dialog box. This helps ensure that the gutter margins on the front and back of a sheet are positioned on the same edge of the sheet. The position of the Left margin on the front side of a sheet becomes the position for the Right margin on the back side of the same sheet. Margins of the left page are a mirror image of those of the right page. That is, the inside margins are the same width, and the outside margins are the same width. So, if after you entered a value for the gutter margin, you choose Normal in the Multiple pages list, and you later printed the document on the front and back sides of a sheet, the gutter margin can only prevent text from being obscured on only one side of the page, but not on the other side of it. So, for a document you plan to print on both sides of sheets, always make sure to choose Mirror margins to help position gutter margins at the same edge on both sides of the sheets.

- On the File menu, click Page Setup, and then click the Margins tab.
- In the Multiple pages list, select Mirror margins.
- In the Inside and Outside boxes, enter values for the mirror margins
- In the Gutter box, enter a value for gutter margins for bound documents.
- Click an appropriate option in the Apply to box.
- Click OK.
 |
| Fig: Page Setup dialog showing mirror margins |
Thank you for taking your time to read this tutorial. Please do drop by again for future updates and helpful tips. Your visits will surely be worth it. I sincerely appreciate your visits and presence here. If you are finding these tutorials and tips informative and helpful, please kindly recommend this blog to your friends. If, on the other hand, there is any area you feel improvement is needed, please kindly forward a piece of advice. These will be highly welcomed and appreciated. Feel free to drop comments or ask questions using the comment box below. Your comments will be promptly reviewed and published and your questions speedily looked into and answered in the best possible manner. Thanks.

It is very informative but I want you to explain mirror margins, its uses and how to print multiple pages document using mirror margins for binding purpose. Please tell me the appropriat value of mirror margins for binding.
ReplyDeletewοndеrful post, veгу infoгmаtivе.
ReplyDeleteI wondeг whу the οther expeгts of thіs ѕector dо not unԁerѕtand this.
Yοu shoulԁ continue youг writing. Ӏ
am ѕuге, you hаνe а great reаdeгѕ' base already!
My page :: bengali kabita
i have struggled with this problem since last Christmas when i got 2003 as a gift. only today do I learn how to format the page thanks
ReplyDelete9-14-12
Ѕomеone neсeѕsarily аѕsiѕt to make seriously aгtiсlеs I ωоuld state.
ReplyDeleteThis iѕ the first time Ӏ frequented your web
page anԁ up tο now? I surpгіsed ωith the analуѕis you maԁe to make this рaгtіculаr рublіsh increԁіble.
Magnifiсent actіvitу!
Stop by my homepage ... funny text messages
Thanks for providing all the informations from which I learn a lot.
ReplyDeleteThanks for great share regards to Thanks for sharing your research new on paper size and alignment
ReplyDeleteThe quality and way of presentation of this of this blog was quite worthy and appreciating. And thanks for posting an interactive tutorial related to page setup and complete list of paper sizes keep posting on.
ReplyDeletevery informative thanks for such a helping hand
ReplyDeleteThanks - this is really an excellent explanation! And the illustration makes the difference between a gutter and an inside margin, very clear! (I always thought of the gutter as the center between two columns of text on a page.)
ReplyDeleteSometimes when reading specs, it's difficult to determine whether they want to add the gutter to the inside margin and keep the gutter at zero, or enter a separate gutter measurement and inside margin measurement! But at least now I know the difference between the gutter and the inside margin!
To SynergyBreakthroughs and other dear readers who commented earlier, I say thanks a lot for your motivating comments. My heart is so uplifted by your encouraging comments.
DeleteI'm sorry I've not been updating this old blog. I have other projects taking up my time. Very soon, though, I'll be sharing with you a link to my new website where I publish articles on newer versions of MS Word as well as newer topics not currently covered in this blog.
Thanks all for stopping by and taking your precious time to read this blog post and as well commenting.
We have worked hard to develop a professional service to clean your gutters in Bristol and Bath, and we do it whilst empowering our staff to enjoy their jobs.
ReplyDeleteSource: gutter cleaning
this is very useful for me thanks for this post
ReplyDeletethis is very useful for me thanks for this post
ReplyDeleteThank you so much, it very helpful.
ReplyDeleteVery Nice Article it's very Informative i have learnt lot.Thanks for sharing.Such Informative Article How to set margins in word
ReplyDeleteI HAVE A REQUEST but... This is so helpful, thank you very much for taking the trouble. My request is that you explain why in Word 10, viewing 2 pages at a time, in one place the gutter jumps and flickers from left to right?
ReplyDeleteCan truly relate and retain this outstanding post. Very well written. libreoffice inner margin
ReplyDeleteAwesome
ReplyDelete