


| The ToolbarA toolbar is a bar containing buttons and options that you use to carry out commands. With toolbars, commands become just handy and easily accessible to users. The buttons contained in them are used to access commands more quickly than by opening the menus and the respective dialog boxes. ScreenTips I mentioned earlier that toolbars contain smart icons serving as shortcuts to the main menu commands. However, these toolbars offer too many buttons of various looks and shapes for a user to easily remember their names or their functions. You might well ask: 'What is the use of a toolbar button if its name or function is not known?' Well, the ever-creative programmers at Microsoft also once contemplated this problem. So they fashioned a tool known as ScreenTip. ScreenTips, also known as Tooltips, are little pop-up descriptions that appear when you rest the mouse pointer over a toolbar button. They appear on the screen to provide certain information about a toolbar button, tracked change, or comment or to display a footnote or endnote. So, any time you are at a loss as to the name or use of a toolbar button, simply rest the mouse pointer over such button and immediately, you'll see a little text pop-up below the pointer, saying something. This is a ScreenTip or ToolTip. In case the ScreenTips don't appear when you move the pointer over a button, it is possible the feature has been disabled/turned off. You can turn it on by doing the following:
HOW TO DISPLAY/INVOKE A (MISSING) TOOLBAR Suppose a toolbar you need very much to hasten your work (e.g., the Formatting Toolbar) is not currently visible on screen, what would you do to invoke such 'missing' or 'hiding' toolbar from its hiding place? Well, anytime you face a situation like this, simply use any of the following methods to bail yourself out. |
Displaying A Toolbar Using the View Menu
- On the Menu bar, click View. This displays the View menu.
- Then, on the View menu, point to Toolbars item.
- Select and click the name of the desired toolbar from the Toolbars sub-menu.The toolbar you selected will then appear on screen.
This now displays the Toolbars sub-menu, in which the names of certain toolbars are shown. Here, you'll find that some of the toolbar names have a check mark to the left of them, while some have none. The check mark indicates the toolbar bearing it is already displayed on screen.
 |
| Fig: Showing or hiding a toolbar using the View menu |
Those are the steps you'll also follow to hide a toolbar you no longer want on screen at a particular moment.
NOTE:If you can't find the particular toolbar you are really looking for on the Toolbars sub-menu, click Customize, and then click the Toolbars tab in the Customize dialog box that appears. In the Toolbars list, click the checkbox next to the name of the toolbar you want and then click Close. See figure below.
 |
| Fig: Showing or hiding a toolbar using the Customize dialog box |
To Display a Desired Toolbar Using a Shortcut
Simply right-click an empty space on any toolbar, and then click the name of toolbar you want.
TIP: If you do not see the toolbar you're looking for on the shortcut menu, click the Toolbar Options arrow, point to Add or Remove Buttons, click Customize, click the Toolbars tab in the Customize dialog box, and then, in the toolbars list, click the checkbox next to the toolbar you want and click Close when you are through.
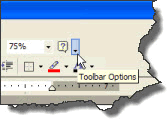 |
| Fig: Displaying the Customize dialog box via the Toolbar Options button |
At this juncture, I'm quite confident to a reasonable extent that how to determine the name of any toolbar button/icon should never be a problem to you, since the ScreenTips are there to "tell-tale". Right now, your problem, I guess, should be: "What exactly is the function of each of these toolbar buttons/icons?" Well, if you have asked that question, it simply shows you are bright and ready to learn. The good news is, you are not helpless: I have dedicated the following sections to expatiate a little on the Standard toolbar, Formatting toolbar, and the Drawing toolbar, since you will be using them constantly.
Standard Toolbar
You have learned that the Standard toolbar is, by default, docked directly below the Menu bar, and that it contains buttons used for performing tasks similar to the commands available in the Menu bar. Let's now take a moment to identify the name and purpose/use of each of the buttons on the Standard toolbar.NAME | ICON | USE |
| New | Creates a new blank document based on the default or current template. | |
| Open |  | Opens a document previously created and saved in Word. |
| Save |  | Saves new changes to the current document or file, with its filename, location and document format. |
 | Sends the content of the current document as the body of an E-mail message. | |
| Search |  | Finds files, Web pages and Outlook items based on the search criteria you enter. |
 | Prints the active document or selection. | |
| Print Preview |  | Shows how a document or file will look when you print it. |
| Spelling |  | Checks spelling in the active document, file or item. |
| Cut |  | Removes the selected item from the active document and places it in the Clipboard. |
| Copy |  | Copies selected text or object to the Clipboard. |
| Paste |  | Pastes the item you cut or copied into (the position of the insertion point) the document from the Clipboard. |
| Format Painter |  | Copies the format from a selected text or object and applies it to the text or object you click. |
| Undo |  | Reverses the last action or deletes the last entry you typed. Click the arrow next to this icon to select and reverse multiple actions at a time. |
| Redo |  | Reverses the action of the last Undo command. Click the arrow next to this icon to select and reverse multiple Undo command actions. |
| Insert Hyperlink |  | Inserts a new hyperlink or edits the selected hyperlink. |
| Tables and Borders |  | Displays Tables and Borders toolbar, which offers tools for editing/formatting a table and its content. |
| Insert Table |  | Inserts a table in the document. Click and drag to specify the number of rows and columns. |
| Insert Microsoft Excel Worksheet |  | Inserts a new Microsoft Excel worksheet at the insertion point. Click and drag to specify the number of rows and columns. Use the Excel tools on the toolbar to edit the table. |
| Columns |  | Changes the number of columns in a document or a section of a document. |
| Drawing |  | Shows or hides the Drawing toolbar. |
| Document Map |  | Used to turn on or off the Document Map. Document Map shows the outline structure of a document so that you can quickly navigate through the document and keep track of your location in it. |
| Zoom |  | Used to "zoom in" to get a close-up view of a document or "zoom out" to see more of the page at a reduced size. |
| Show/Hide |  | Shows or hides non-printing characters, such as tab characters, paragraph marks and hidden text. |
| Office Assistant (Microsoft Office Help) |  | Opens Help or invokes the Office Assistant to provide help topics and tips to help you accomplish your task. |
Formatting Toolbar
The Formatting toolbar offers shortcut buttons to help format a document quickly. From the Formatting toolbar, you can quickly apply formatting attributes such as Font; Font Color; Alignment; Line Spacing; Bullets and Numbering, etc, document text, to save time.The following table provides a list of Formatting toolbar buttons and a brief description of each.
NAME | ICON | USE |
| Style |  | Opens a Style drop-down list from which you can select one. |
| Font |  | Changes the font of the selected text or number. Click the drop-down arrow beside the box and select a font from the list. |
| Font Size |  | Changes the size of the selected text or number. Enter a size value in the box, or select an appropriate size from the drop-down list. |
| Bold |  | Applies or removes bold formatting to or from a selected text or number. |
| Italic |  | Makes selected text or number italic, but removes italic from selected text or number if it's already italic. |
| Underline |  | Underlines (rules a line) or removes underline formatting from selected text or number. |
| Align Left |  | Aligns the selected text, number or inline object to the left with a jagged edge. |
| Center |  | Aligns selected text, numbers or inline objects to the center. |
| Align Right |  | Aligns the selected text, number or inline objects to the right, with a jagged edge. |
| Justify |  | Aligns the selected paragraphs to both the left and right margins or indents. |
| Numbering |  | Adds numbers to or removes numbers numbers from selected paragraphs. |
| Bullets |  | Adds bullets to or removes bullets from the selected paragraphs. |
| Decrease Indent |  | Indents the selected paragraph to the previous tab stop or indents the content of the selected item to the left by one character width of the standard font. |
| Increase Indent |  | Indents the selected paragraph to the next tab stop or indents the content of the selected item to the right by one character width of the standard font. |
| Outside Border |  | Adds or removes a border around the selected text, paragraphs, cells, pictures or other objects. |
| Highlight |  | Marks text so that it is highlighted and stands out from the surrounding text. |
| Font Color |  | Formats the selected text with the color you click |
Drawing Toolbar
The Drawing toolbar is located at the bottom of the window, between the Horizontal Scroll bar and the Status bar. Like every other toolbar, this also contains smart icons representing shortcuts to Main menu commands in Word.It holds buttons/tools used in creating drwaings, such as rectangles, ovals, lines, arrows, WordArt text, etc. It also offers tools for inserting organizational charts and ready-made pictures and Clip Arts from their different locations.
Also included in this toolbar are tools for formatting inserted objects and for adding special effects such as shadow or 3-D to lines, rectangles, ovals, etc. Like every other toolbar also, the Drawing toolbar can be displayed or hidden.
The following table shows a list of tools offered on the Drawing toolbar, and their functions:
NAME | ICON | USE |
| Draw |  | Offers a number of options for defining the relative positions, arrangements, rotation, etc, of drawings in a document. It also offers tools for changing the shape of AutoShapes. |
| Select Objects |  | Changes the pointer to a selection arrow so you can click to select objects in the active window. |
| AutoShapes |  | Offers a group of ready-made shapes that include basic shapes, such as rectangles and circles, including a variety of lines and connectors, block arrows, flowchart symbols, stars and banners, and callouts. |
| Line |  | Allows you to draw a straight line where you click or drag in the active window. |
| Arrow | Draws or inserts a line with an arrow head where you click or drag in the active window. | |
| Rectangle |  | Draws a rectangle where you click and drag on the active window. You can also draw a square using this tool by holding SHIFT while you drag. |
| Oval |  | Draws an oval where you click and drag in the active document. To draw a (perfect) circle, hold down SHIFT while you drag. |
| Text Box |  | Draws a text box with horizontal direction where you click and drag in the active document. |
| Insert WordArt |  | Creates decorative text by inserting a Microsoft Office drawing objects. |
| Insert Diagram |  | Creates an organizational chart or a circle, radial, pyramid, or Venn or target diagram in your document. |
| Clip Art |  | Opens the Clip Gallery where you can select the clip art image you want to insert in your document or update your clip art collection. |
| Insert Picture |  | Inserts an existing picture in your active document at the insertion point. |
| Fill Color |  | Adds, modifies, or removes the fill color or effects from the selected object. |
| Line Color |  | Adds, modifies, or removes the line color from the selected object. |
| Font Color |  | Allows you to add, modify, or remove the text color of the selected text. |
| Line Style |  | Used to select a thickness for the selected line. |
| Dash Style |  | Allows you to control the appearance of the selected line. |
| Arrow Style |  | Allows you to select the style of arrowhead. |
| Shadow Style |  | Allows you to select the shadow appearance of the selected drawing object. |
| 3-D Style |  | Allows you to add depth to drawing objects such as lines, AutoShapes, and freeform objects. |
Thank you for taking your time to read this tutorial. Please visit this blog again for future updates and helpful tips. Your visits will surely be worth it. I sincerely appreciate your visits and presence here. If you are finding these tutorials and tips informative and helpful, please kindly recommend this blog to your friends. If, on the other hand, there is any area you feel improvement is needed, please kindly forward a piece of advice. These will be highly welcomed and appreciated. Feel free to drop comments or ask questions using the comment box below. Your comments will be promptly reviewed and published and your questions speedily looked into and answered in the best possible manner. Thanks.

thanks
ReplyDeleteBy default, when you open any an applications, the Drawing Toolbar appears at the bottom of the screen, and if it is disappear then the above given steps and information really helps a lot.
ReplyDelete@MS Office support: Thanks for adding this. I also appreciate your visiting this blog. Please visit again.
ReplyDeletethank u very much..
ReplyDeleteThere are still many toolbars. You forgot it. Hmm. But, it is helpful for our exam tom. ^_^ Thanks for that!
ReplyDeleteyeyeye
ReplyDeletegoooooooood
ReplyDeletei need 80 icons. were could i find them?
ReplyDeletesame to you
DeleteYou forgot a lot of it but got the basics down thanks #swag
ReplyDeletegoooooooooooooooooooooood
ReplyDeleteThis post is very Interesting and beautiful blog lovely presentation thanks for sharing your views...
ReplyDeleteYou also visit Microsoft Word Support my site.
what does it mean when "hide/show" icon is red?
ReplyDeleteHide/Show icon turns red? Hey. Which version of Word is that? I've never seen the icon turn red. All I know it does is show non-printing characters, such as tab characters, paragraph marks and hidden text when enabled and hides them when disabled. As far as I know, it doesn't do beyond that, neither does it change color. Thanks for the comment and your kind visit. Enjoy!
Deletei dont know
Deletehurrrrrrrrrrryyyyyyyyyy jeo kakyoo cha gy oo dari waly ki assignment kra di
Deletejutt nu pass kra dita u r too gud
DeleteVery well expained.. I really overwhelmed to read this post.
ReplyDeleteMicrosoft Office Support In USA | Microsoft Office Problems
Nice but, isnt it hard to create org charts from word? I'm used to create charts using Creately Org Chart maker first, them import to word.
ReplyDeleteWell Written.... Thanks for sharing this article.....
ReplyDeleteexcel training
awesome!
ReplyDeletewow......am really overwhelmed after i read this post love to see more visit
ReplyDeletehttps://www.makeoverarena.com/wapdam-music-video-game-movies-www-wapdam-com/
nice update you got here love to see more you can visit
ReplyDeletehttps://www.makeoverarena.com/toxicwap-com-full-mp3-downloads-android-games-tv-series/
Thanks for the post
ReplyDeleteMS WORD SHORTCUT KEYS
WORD SHORTCUT KEYS
ReplyDeleteReally nice blog, got many thing to learn from this post ,where they discussed about the MS WORD SHORTCUT KEYS
WORD SHORTCUT KEYS
Good article,resonated with me from start to finish.
ReplyDelete|Microsoft Outlook Support UK || Microsoft Phone Number |
Mindblowing. Thank you. I like your website. Wordpress shortcut keys
ReplyDeleteThis vlog is Awesome
ReplyDeleteThanks for sharing this information
Thanks so much for your info
ReplyDeleteI love ❤️ this, good �� job
ReplyDeleteI read your blog frequently, and I just thought I’d say keep up the fantastic work! It is one of the most outstanding blogs in my opinion. 2ms office 2016 product key
ReplyDeleteNice post! This is a very nice blog that I will definitively come back to more times this year! Thanks for informative post. read
ReplyDeleteThank you for your post. This is excellent information. It is amazing and wonderful to visit your site. NFFI
ReplyDeleteHi, I reading your post. This is very nice article.I want to twite to my followers.
ReplyDeleteIf you need baclink servicesword update please contact me
Awesome Microsoft tutorials the idea you provide it help me a lot to improve my knowledge about this field. Thanks
ReplyDeleteDIS
HLA