Custom Search

Create Newsletter-Style Layout Using Text Boxes

Understanding the Newsletter-Style Layout
A document using a newsletter-style layout contains pages formatted in columns in which text flows continuously from the bottom of one column to the top of the next column.  A newsletter-style layout is created when you format text in newsletter-style columns, or when you lay out text or a story in a newsletter using linked text boxes, or a table. Newsletters, brochures, reports, and flyers, are examples of documents in which the newsletter-style layout is extensively used. When you create a newsletter-style layout using the Columns command, text flows from the bottom of column 1 to the top of column 2, and from the bottom of column 2 to the top of column 3, (etc) on the same page, and then from the bottom of column 3 to the top of column 1 on the next page. Creating a newsletter-style layout with linked text boxes, however, gives you greater control over the manner in which text flows from one 'column' (text box) to another. For example, using linked text boxes, you can lay out text in such a way that text, or stories flow in side-by-side columns from page to page. In this instance, text from column 1 on page 1 flows to column 1 on page 2, and so on; and the text in column 2 on page 1 also flows to column 2 on page 2, and so on, parallel to column 1. Using linked text boxes, you can also start text or a story on one page, skip a number of pages, and then have the text or story continued on a further page, in the same document. Using tables also, you can create side-by-side columns, but linked text boxes give you more control over the text flow.
   In the post, "Create Newsletter-Style Columns," I discussed extensively how to use the Columns command to create newsletter-style columns to continue text in the next column on the same page. In this post, I will be sharing with you how to lay out text or a story in newsletters by creating linked text boxes.
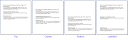
The following images show the text-flow patterns in pages formatted in different newsletter-style layouts:


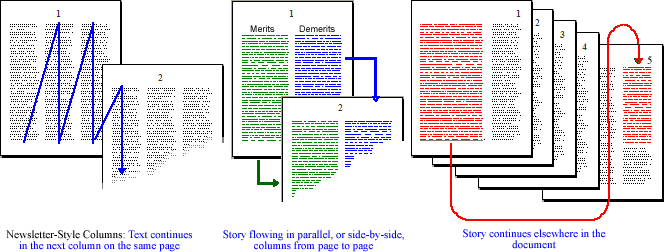
Text Flow Pattern in Newsletter-Style Columns
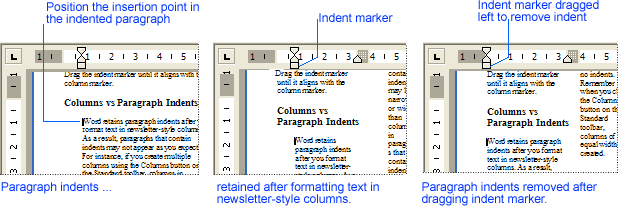
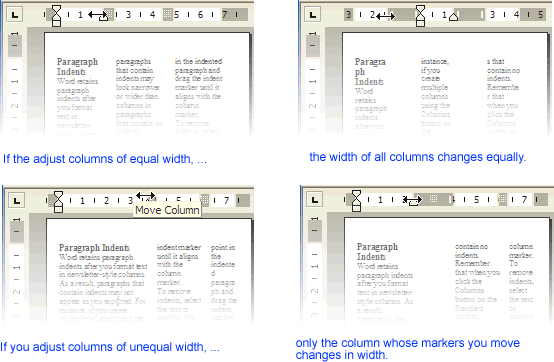
Text in newsletter-style columns flows continuously from the bottom of one column to the top of the next column. You can specify the number of newsletter-style columns you want, adjust their width, add vertical lines between columns, as well as add a banner heading that spans the width of the page. Also, you can force the start of a new newsletter-style column, as well as balance newsletter-style column length on a page.


Flow Text or Stories in Parallel, or Side-by-Side Columns, from Page to Page with Linked Text Boxes
When you create newsletter-style columns with the Columns command, text wraps from one column to another on the same page, before eventually flowing to the next page. Using linked text boxes, however, you can create columns of text that flow parallel to each other, from page to page, instead of wrapping from one column to another - as the case is with creating columns with the Columns command. With linked text boxes, you are able to alter the pattern of text flow, by having text from column 1 flow directly to column 1 on the next page; and the text in column 2 also flowing straight to column 2 on the next page, parallel to column 1. Put simply, text in column 1 continues in column 1 on the next page; and text in column 2 (beside column 1), continues directly in column 2 on the next page, instead of text in column 1 continuing in column 2 on the same page. Laying out text in this manner is useful when you are comparing and contrasting two items, as in pairing two similar stories or articles in two different languages. For example, you can put an article in English in a column on the left, and the same article in French in a column on the right, with both columns appearing side by side on each page.

Use the following procedure to create a newsletter-style layout, whereby text or stories flow in side-by-side columns, from page to page, in a document.
  1. Switch to print layout view.
  2. First create a new document by clicking New on the File menu, and then click Blank Document on the New Document task pane.
    Alternatively, on the Standard toolbar, click New Blank Document.
  3. On the Standard toolbar, click Show/Hide to display paragraph marks.
  4. If you want to allow room for a headline or other text before the linked text boxes, click at the top of the page, and press ENTER.
  5. Click where you want the linked text boxes to begin.
  6. On the Insert menu, or on the Drawing toolbar, click Text Box.
    A drawing canvas, and the Drawing Canvas toolbar appear; and the mouse pointer becomes a Precision Select pointer.
  7. Click inside the drawing canvas (or elsewhere on the page), and drag the pointer where you want the first column. The Text Box toolbar appears.
  8. On the Insert menu, or on the Drawing toolbar, click Text Box again.
  9. Drag the pointer in the existing drawing canvas, or elsewhere on the page where you want the second column.
  10. Move the pointer immediately before the last paragraph mark on the page, and press CTRL+ENTER to create a hard page break.
  11. Repeat steps 3 through 9 for each page that will contain side-by-side columns in your document, and then return to the first text box you created.
  12. Click once in the text box on the left to select it.
    The Text Box toolbar always appears when a text box is selected.
  13. On the Text Box toolbar, click Create Text Box Link.
    The pointer becomes a pitcher.
  14. Click the text box on the left side of the second page to create a link.
    If the pitcher-shaped pointer does not appear to tilt (or pour) as the pointer hovers above a text box, it means the text box is not empty, and so, you can't create a link to it.
  15. Repeat steps 11 through 13 to create links for all text boxes within the same story on the left side of the document.
  16. In the text boxes on the right side of the page, repeat steps 11 through 14 for every text box in the right chain, or story.
    NOTES
    Please note that before a pitcher-shaped pointer can tilt to enable you link text boxes or other shapes, all the following conditions must be met:
    • Linked text boxes must be contained in a single document.
    • The text box to which you are linking must be empty.
    • The text box must not already be in a chain, or story.
    • The text box cannot be contained in a different subdocument in a master document.
    • The current link you are creating in this story has not exceeded the maximum number of links you can have in one story.
      The maximum number of links you can have in one story is 31, meaning that a maximum of 32 text boxes or shapes can be linked.


Create Linked Text Boxes to Continue a Story Elsewhere in a Document
You can create a newsletter and have a story that begins on one page to continue on another page, many pages way. How? Well, you do this by typing text in text boxes, and then creating text box links to make the story flow from one text box to another in the order you want. For example, you can begin a story on page 1 of a newsletter and then continue the story on page 5 of the newsletter. To achieve this, you'll place a text box on page 1 where you'll begin the story, and then place another text box on page 5, where the story will continue. After that, you'll  link the text box on page 1 to a/the text box on page 5. When you add lines of text to a linked text box, the text flows forward into the next text box. When you delete lines of text from a text box, the text in the next text box moves backward. You can link several text boxes in a story, and you can have multiple stories in a document. As noted earlier, all the linked text boxes must be contained in a single document. The links can occur in a forward, or lateral, or backward direction. After you've linked the text boxes and inserted text, you can change the shape of the text box container for the story to another container shape such as circle, banner, flow chart shape, or other AutoShape.

Follow these steps to use linked text boxes to continue a story elsewhere in a document:
  1. In print layout view, click the spot where you want to insert the first text box.
  2. On the Insert menu, or on the Drawing toolbar, click Text Box.
    A drawing canvas appears at the insertion point, and the pointer becomes a Precision Select pointer.
  3. Click in the drawing canvas and drag, or drag in your document where you want to insert the text box. 
  4. Repeat steps 2 and 3 to insert additional text boxes where you want the text to flow. 
  5. Click once in the first text box to select it.
    Alternative, select the text box by moving the pointer over the border of the text box until the pointer becomes a four-headed arrow, and then click the border. 
  6. On the Text Box toolbar, click Create Text Box Link.
    The pointer becomes pitcher-shaped.
  7. Click in the empty text box into which you want the text to flow.
    When you move the upright pitcher over a text box that can receive the link, the pitcher tilts ( becomes a pouring pitcher).
  8. To link to additional text boxes, click the text box that you just created the link to, and then repeat steps 6 and 7 to create links.
  9. In the first text box, type or paste the text that you want.
    As the text box fills, the text will flow into the other text boxes that you've linked.
    NOTES

    • If you click Create Text Box Link, and then decide you don't want to link to another text box, press ESC to make the pitcher disappear.
    • If you have text outside the text boxes in the page, specify how text wraps around each text box. How?
      i).  Click the border of each text box you want to wrap text around.
      ii). On the Drawing toolbar, click Draw, point Text Wrapping, and then click the text wrapping option (such as Square, Tight, Through, etc) you want.
      ** If you have created the text box inside the drawing canvas, click the frame of the drawing canvas, on the Drawing Canvas toolbar, click the Text Wrapping button, and then click the text wrapping option you want.


How to Automatically Indicate the Page or Position on a Page where a Story is Continued On, or From
In newspapers, you doubtless must have found that some stories that begin on the front cover page are usually continued elsewhere, on another page in the magazine. Where the first half or portion of the story ends on the cover page, you usually would find a line of text (which could read, "Continued on page 5,") indicating the page on which the story is continued in the paper. Also, on the continuation page, immediately before the story continues, another line of text (which would read "...continued from page 1") also tells you the page on which the part of the story immediately before this one can be found.

Under this heading, you will learn how to include the "Continued on page #," and " ...continued from page #" phrases in appropriate locations in the text boxes when you create linked text boxes to continue a story elsewhere in a document.

A simple way to indicate the continuation page in the text boxes is to type the Continued on page #, or ...continued from page # phrase, where you want it in the text box concerned. The major setback with this method is that you will have to manually update the page numbers in the phrases each time the referred text box moves from one page to another.

However, by assigning a bookmark to each text box in a story, you can have Word automatically insert and update the location or position of each referred text box when you insert the PageRef field in a "Continued", or "... continued from page ..." phrase. Because I'm only just using them in passing, I won't going into details discussing a bookmark or the PageRef  field in this post. But be informed that a bookmark is a location or selection of text in a file that you name for future reference purposes. The PageRef field is used to insert the field code that inserts the page number of a bookmark for a cross-reference. Its syntax is, {PAGEREF Bookmark [\* Format Switch ] }.


Now, let's get to business.
  1. Create the linked text boxes for the story by following the steps highlighted above, under the heading, "Create Linked Text Boxes to Continue a Story Elsewhere in a Document."
    IMPORTANT !
    HERE, YOU MUST DRAW THE TEXT BOXES INSIDE THE DRAWING CANVAS TO GET A RELIABLE RESULT WITH THE PageRef FIELD
  2. Click inside the first linked text box, to make the text box frame, and the drawing canvas frame appear.
  3. Move the pointer over the frame around the drawing canvas, and then click when the pointer becomes a four-headed arrow, to select the drawing canvas frame.
    Make sure it is the drawing canvas frame you click. If you click the frame around the text box itself, you will not get a reliable answer at the end.
  4. On the Insert menu, click Bookmark, under Bookmark name, type a name, and then click Add.
    The bookmark name you type must begin with a letter and can contain numbers, but must never include spaces. Use the underscore character in place of any space you may want to include. Example, "First_text_box."
  5. Repeat step 4 for the remaining linked text boxes in the story.
  6. In the first linked text box, click the end of the penultimate line, and then press SHIFT + ENTER, to for insert a line break. This forces the line to wrap to the next line.
  7. Type the word "Continued", press the space bar once, and then click Field on the Insert menu.
    The Field dialog box is displayed.
  8. In the Categories box, click Links and References, and then click PageRef, under Field names.
  9. In the Bookmark name box, under Field properties, click the bookmark name of the second linked textbox.
  10. Under Field option, click the Position of paragraph check box, and then click OK.
    The field code, { PAGEREF Bookmark [\p] }, is inserted and the words, "on page #," is inserted at the insertion point. The hash (#) character here is the page number. It is the page number you will see, not #.
    If the word that appear on performing step 10 is "below", or "above", it means you did not attach the bookmark to the drawing canvas, but the text box frame, or you did not draw the text box inside the drawing canvas. On the other hand, if the two linked text boxes are on the same page, it is "below", or "above" that will appear on performing step 10.
    Done correctly, the current line will now appear as, "Continued on page 5", for example.
  11. Position the insertion point after the last text (the #, 5 for example), and then press SHIFT + ENTER, to insert another line break, so that only the "Continued on page #" phrase is on the line.
  12. In the second linked text box, position the insertion point at the beginning of the fist line, type, "... continued from page,"  and then press the space bar once.
  13. On the Insert menu, click Field, click PageRef, click the bookmark name of the first linked text box, and then click OK.
    The field code, {PAGEREF Bookmark }, is inserted and the page number of the page where the first linked text box is located, is inserted, so that combined with the text you first typed, you should see something like, "... continued from page 1."
  14. With the insertion point still positioned after the number inserted, press SHIFT + ENTER again to wrap to the next line.
    NOTES
    • In case you wish to change the fill, or the border color of either the drawing canvas or the text box, simply double-click the frame of the drawing canvas, or the text box, and then apply the preferences you want in the dialog box that opens.
      Alternatively, use the Line Color, or the Fill Color button on the Drawing toolbar.


RELATED POSTS


Create Newsletter-Style Columns

You can format a document in such a way that a page is divided into a number of vertical areas for displaying text. Each vertical area is called a column. Newspaper/newsletter pages are usually displayed in a multiple-column style. In newsletter-style columns, text flows continuously from the bottom of one column to the top of the next. In Word, you can format all or part of your document with newsletter-style columns. Newsletter-style columns can be of equal or unequal width. A page or document can contain a single or multiple columns, and you can also vary the number of columns in different parts of a page, or in pages in a document. To create, view, or change the width of newsletter-style columns, switch to print layout view or print preview. Normal view displays multiple columns in a single column.

Fig: A document with multiple sections and columns


Creating Multiple Columns
A multiple-column page contains text displayed in two or more columns of equal or unequal width. Different parts of a single page can contain different numbers of columns. You can change the look of a document by formatting all or part of it in newsletter-style columns. Each part of a document containing a different number of columns has its own section. So, to format a part of a document in a different number of columns, insert section breaks.

Fig: Pages with different numbers of section and newsletter-style columns


The Columns button on the Standard toolbar is used to create columns quickly. When you click the Columns button on the Standard toolbar, Word creates columns of equal width. To create columns of unequal width, and specify other options, use the Columns command on the Format menu.

When you execute the Columns command, only the section that contains the insertion point receives the column formatting. If you have not divided the document into sections, Word formats the entire document in the number of columns you specified. If you select a portion of text and then choose the Columns command, Word inserts section breaks at the beginning and end of the selected text and applies the column format just to the selected text in the newly created section.


To view or move section breaks, switch to Normal view, or in Print Layout view, click the Show/Hide button on the Standard toolbar.

To create columns of equal width
  1. In print layout view, do one of the following:
    • If your document contains only one section and you want to format the entire document in newsletter-style columns, click anywhere in the document.
    • If you want to format only part of your document in newsletter-style columns, select the text you want to format in columns.
    • If your document has more than one section, position the insertion point in the section where you want to format the text in newsletter-style columns.
  2. On the Standard toolbar, click the Columns button, drag to the right to select the number of columns, and then release the mouse button.


Create a Banner Headline
A banner headline is a heading that spans newsletter-style columns. It is a single-column text, and you can add it above newsletter-style columns in a multiple-column document. A story in a typical newsletter can span multiple columns. Create a banner headline to span the top of all the columns spanned by a particular story or article in a document or newsletter. Doing so will help readers know where one story begins and ends and where another begins.
Here are the steps to create a heading that spans newsletter-style columns in Word.
  1. Switch to print layout view, if you are not in print layout view already.
  2. Do one of the following:
    • If heading text already exists, select it.
    • If heading text does not already exist,
      1. Click the beginning of the leftmost column, type the heading, and then press ENTER.
      2. Select the heading text.
  3. On the Standard toolbar, click the Columns button, and then drag to select a single column. 
  4. While the text is still selected, apply formats (such as font, font size, bold, or center) to the headline by clicking the appropriate buttons on the Formatting toolbar.
    Alternatively, apply a heading style.
    Such formatting will make the headline stand out.
Fig: Creating a heading that spans newsletter-style columns


Columns and Paragraph Indents
Word retains paragraph indents after you format text in newsletter-style columns. As a result, paragraphs that contain indents may not appear as you expected. For instance, if you create multiple columns using the Columns button on the Standard toolbar, columns in paragraphs that contain indents may look narrower or wider than columns in paragraphs that contain no indents. Remember that when you click the Columns button on the Standard toolbar, columns of equal width are created.

To remove indents, select the text or position the insertion point in the indented paragraph and drag the indent marker until it aligns with the column marker.
Fig: Removing paragraph indents from newsletter-style columns


Creating Columns of Unequal Width
To create newsletter-style columns of unequal width, use the Columns command on the Format menu. In the Columns dialog box, you can specify the exact measurement you want for the width of each column. Using sections, you can vary the number and width of columns within a document or on a page.

Word provides five preset formats in the Columns dialog box for creating columns, but two of these are for creating columns of unequal width. The Left preset format makes the left column narrower than the right column; the Right preset makes the right column narrower. In both formats, the wide column is twice as wide as the narrower column.

Follow these steps to create two columns of unequal width
  1. In print layout view, do one of the following:
    • If your document has only one section and you want to format the entire document in newsletter-style columns, position the insertion point anywhere in the document.
    • If you want to format only part of your document in columns, select the text you want to format in columns.
    • If your document contains more than one section, click anywhere in the section you want to format the text in newsletter-style columns.
  2. On the Format menu, click Columns.
    The Columns dialog box is displayed.
    Fig: Creating columns of unequal width using preset formats in the Columns dialog box
  3. Under Presets, click Left or Right.
    To specify measurements for columns of unequal width, type or select measurements under Width and Spacing.
  4. Click the OK button.


To specify exact column width, see "Specifying Exact measurements," later in this post. To control column width by dragging column markers on the ruler, see "Changing Column Width and the Space Between Columns," later in this post.

To create more than two columns of unequal width
  1. In print layout view, do one of the following:
    • If your document has only one section and you want to format the entire document in columns, position the insertion point anywhere in the document.
    • If you want to format only part of your document in columns, select the text you want to format in columns.
    • If your document contains more than one section, position the insertion point in the section you want to format its text in columns.
  2. On the Format menu, click Columns.
    The Columns dialog box is displayed.
  3. In the Number of Columns box, type or select the number of columns you want.
  4. Clear the Equal Column Width check box.
  5. Under Width and Spacing, type or select a measurement in the Width box or Spacing box for each column.
    The Spacing box adjusts the space to the right of the column.
  6. Click the OK button.


Specifying Exact Measurements
If you create multiple columns using the Columns button on the Standard toolbar, or you select one of the preset formats in the Columns dialog box, columns of default width and space are created. If you prefer not to use the preset formats, display the Columns dialog box by clicking the Columns on the Format menu, and then specify the number of equal or unequal columns you want, as well as control the width of each column, and the amount of space between columns. 


Changing Column Width and the Space Between Columns
You can change the width and space between newsletter-style columns using either the horizontal ruler, or the Columns dialog box. Dragging the column markers on the horizontal ruler, you can quickly modify the width of individual columns. The Columns dialog box, however, enables you to specify exact measurements for column widths and spacing.
Here are the steps to change column width and space between columns using the horizontal ruler
  1. Display the document in print layout view, if you have not done so already.
  2. If your document is divided into sections, position the insertion point anywhere in the section you want to change.
  3. Drag a column marker on the horizontal ruler to adjust the column width or the space between columns.
    NOTE
    • If the columns you are modifying their width are of equal width created with the Columns dialog box, dragging the column markers on the horizontal ruler changes the width of all columns.
    • If you create columns (of equal width) using the Columns button on the Standard toolbar, only the column whose markers you drag will change in width.
    • If columns are of unequal width, only the column whose markers you move changes in width.
    • As you drag column markers to change the width of a column, the space between it and the adjacent column changes as well.
    • To change the width of a column without changing the space between it and the adjacent column, drag the Move Column handle on the horizontal ruler.
    • You cannot drag a column marker beyond the marker of an adjacent column, when modifying columns of unequal width. Instead, you must first drag the column marker of the adjacent column to make it narrower.
Fig: Dragging column markers on the ruler to adjust column width and spacing


Here are the steps to specify exact measurements for column widths and spacing
  1. In print layout view, click in the section you want to change, if the document contains multiple sections.
  2. On the Format menu, click Columns.
    The Columns dialog box appears.
  3. Under Width and spacing, locate the column number under Col # of the column you want to change.
  4. Type or select a measurement in the Width box or Spacing box for column.
    The Spacing box adjusts the space to the right of the column.
  5. Click OK when you are through changing the width and space for each column.
Fig: Specifying exact measurements for column width and spacing


Changing Between Columns of Equal and Unequal Width
You can easily convert newsletter-style columns of equal width to newsletter-letter style columns of unequal width, and vice versa. To change between columns of equal and unequal width, here are the things you should do.
  1. Click in a column of text in the section you want to change.
  2. On the Format menu, click Columns.
    The Columns dialog box appears.
  3. Do one of the following:
    • To make columns have equal width, click the Equal Column Width check box, to put a check mark in it.
    • To make columns have unequal width, clear the Equal Column Width check box, and then adjust the width of each column separately.
  4. Click OK.

Using the ruler
  • To change columns of equal width to columns of unequal width quickly, click each column in the section you want to change, and then drag its column markers on the ruler.
  • To change columns of unequal width to columns of equal width quickly, click in any column in the section you want to change, click the Columns button on the Standard toolbar, and then drag right and select the exact number of columns already existing in the section.


Changing the Number of Columns
Word makes it pretty easy to increase or decrease the number of columns in a section anytime you want. Here are the simple steps you should take to change the number of newsletter-style columns in a section in a document.
  1. In print layout view, do one of the following:
    • If you want to change the number of newsletter-style columns in only a part of your document, select the text you want.
    • If your document contains only one section and you want to change the number of newsletter-style columns in the entire document, click anywhere in the document.
    • If your document contains more than one section, and you want to change the number of newsletter-style columns in the entire document, click the Select All on the Edit menu, or press CTRL + A.
    • If your document has more than one section, click in the section, or select multiple sections in which you want to change the number of newsletter-style columns.
  2. Do one of the following:
    • If the columns are of equal width, click the Columns button on the Standard toolbar, and drag to select a new number of columns you want.
    • If the columns are of unequal width, click Columns on the Format menu, type or select a new number in the Number of columns box in the Columns dialog box, and then click OK.


Adding Vertical Lines Between Columns
Adding vertical lines between columns of text help add emphasis and clarity, and can of course, add beauty and interest to the page. Vertical lines added are as long as the longest column on the page or, the longest column in the section - if the page has more than one section. Among the various document views in Microsoft Word, it is only in print layout view and print preview you can see the vertical lines on screen.
Fig: Document showing vertical lines added between columns
Use these steps to add vertical lines between columns
  1. In print layout view, click in the section that contains the columns to which you want vertical lines added.
  2. On the Format menu, click Columns.
    The Columns dialog box appears.
  3. Click the Line between check box, and then click OK.
Fig: Columns dialog box, showing setting for adding vertical lines between columns


Controlling Column Breaks
A column break is the point in the text where one column ends and the next column begins. Microsoft Word automatically distributes columns on the pages, but you can force the start of a new newsletter-style column by inserting a column break where you want one column to end and the next column to start. To prevent unwanted column breaks between paragraphs or between a paragraph and a graphic that you want to stay together, use the Paragraph dialog box.

Fig: Forcing the start of a new newsletter-style column

Use these steps to force the start of a new column
  1. In print layout view, click where you want to start the new column.
  2. Do one of the following:
    • On the Insert menu, click Break. Under Break types, click Column break, and then click OK.
    • Press CTRL + SHIFT + ENTER

To keep text and graphics together in a column
  1. In print layout view, select the paragraph or graphic you want to keep with the paragraph following it.
  2. On the Format menu, click Paragraph.
    The Paragraph dialog box is displayed.
  3. Click the Line and Page Breaks tab.
  4. Under Pagination, click the Keep With Next check box, and then click OK.


Balancing Columns on a Page
When you create newsletter-style columns, you may find that the last column at the end of a section or page is only partially filled with text. This happens when the amount of text on the page or section is not sufficient to have text evenly distributed among all columns. You can balance the text among columns by inserting a continuous section break at the bottom of the last column, which distributes the text evenly so that a new section can begin on the same page. As a result, newsletter-style column lengths are balanced on page, leaving the bottoms of all columns within one line of each other.
Fig: Distributing newsletter-style columns evenly on a page
The steps to balance newsletter-style column lengths on a page are highlighted below
  1. In print layout view, position the cursor at the end of the text in the columns you want to balance.
  2. On the Insert menu, click Break.
    The Break dialog box is displayed.
  3. Under Section break types, click the Continuous radio button.
  4. Click OK.
    Word inserts a continuous section break, and balances the text equally among the columns.


Note To force a new page to begin where you've inserted a continuous section break (after the balanced columns), switch to Normal view, position the insertion point after the continuous section break, and then insert a hard page break.


Remove Newsletter-Style Columns
  1. In print layout view, click in the section or select multiple sections from which you want to remove newsletter-style columns.
  2. On the Standard toolbar, click the Columns button, and then drag to select a single column. 


Combining Graphics with Text Columns
Like you usually see on newspaper pages, you can improve the beauty of page, or get a more interesting page layout, by inserting a graphic that can occupy a portion of a column, an entire column, or spans multiple columns of text. As with a banner headline, a graphic combined with text columns can help emphasize the information in the columns of text in a page.
Fig: Graphics combined with text columns


To combine graphics with text column
  1. Position the insertion point in the column in a section where you want to add a graphic.
  2. On the Insert menu, point to Picture, click From File, locate and click the picture you want, and then click OK.
    Alternatively, on the Drawing toolbar, click either Insert Picture or Insert Clip Art, and then select the graphic you want in the task pane.
  3. With the graphic still selected, specify a text wrapping option by clicking the Text Wrapping button on the Picture toolbar that is displayed, and then click an option such as Square, Tight or Through.
  4. Drag the graphic to position it where you want it to be: whether to occupy a portion of a column, an entire column, or span multiple columns of text.
    To resize the graphic, click the Resizing handles and then drag appropriately.


    RELATED POSTS


    Numbering Pages

    When the number of pages in a document begins to increase, the need to number the pages becomes increasingly necessary, especially if such document is meant for printing out. Page numbers are necessary for compiling a table of contents (TOC), table of index, or table of authorities. Page numbers make it easy to refer or jump to a specific part of a document, both in soft state and in hard copy. The need to number pages cannot be underestimated. So, if you are editing a document that contains several pages, how do you number the pages? Do you have to type in the page numbers yourself as you type? The answer is NO. Microsoft Word has made the task of numbering pages very easy. To number pages, all you need do is simply instruct Word and it automatically adds page numbers to your document as you type, and also automatically updates them when you add or delete pages.

    Word places inserted page numbers in the header or footer in the top or bottom margin of each page. A page number can be aligned left, center, or right. As with headers or footers, you can use different page number formats in different sections of a document, as well as apply formatting to them.

    Fig: Page number in the header of a page


    You can add page numbers to a document in two ways which are:
    • Using the Page Numbers command.
    • Using the Header and Footer toolbar.


    Inserting Page Numbers Using the Page Numbers Command
    1. Position the insertion point in the section in which you want to insert page numbers.
    2. On the Insert menu, click Page Numbers.
      The Page Numbers dialog box is displayed.
    3. Fig: Page Numbers dialog box with Outside alignment option selected
    4. In the Position box, select the location where you want the page numbers printed. e.g. Bottom of page (Footer).
    5. In the Alignment box, specify how you want page numbers aligned on the page.

    6. TO PRINT AND DISPLAY PAGE NUMBERSCLICK

      On the top-left or bottom-left of the page, relative to the left and right margins.Left
      On the top-right or bottom-right of the page, relative to the left and right margins.Right
      At the center, top or bottom of the page, relative to the left and right margins.Center
      On the inside, relative to the inside edge of the pages that will be bound.Inside
      On the outside, relative to the outside edge of pages that will be bound.Outside

    7. Click OK.


    Adding Page Numbers Using the Header and Footer Command
    1. On the View menu, click Header and Footer.
      The Header and Footer toolbar is displayed.
    2. On the Header and Footer toolbar, click Show Next , Show Previous , or Switch Between Header and Footer to move to the header or footer in which  you want to add page numbers.
    3. Position the insertion point where you want the page number to appear in the header or footer area.
    4. On the Header and Footer toolbar, click Insert Page Number .
    5. Click Close on the Header and Footer toolbar to return to the document.


    How to Insert Page Numbers of the Form 'Page X of Y' Automatically
    This is a detailed way of numbering pages whereby the number of the current page and the number indicating the total number of pages in the document are printed in the header or footer. For example, if your document contains twelve (12) pages and you are currently in page three (3), the page number will be displayed as Page 3 of 12.

    Here are the steps to create page numbers of this form.
    1. On the View menu, click Header and Footer.
      The Header and Footer toolbar appears.
    2. Click the Show Next and the Switch Between Header and Footer buttons to move to the header or footer area in the section you want, and then place the insertion point in the appropriate position where you want the page number to be printed.
    3. On the Header and Footer toolbar, click the Insert AutoText button, and then click Page X of Y in the drop down list.
    4. Click the Close button on the Header and Footer toolbar to return to the document.


    How to Insert Page Numbers of the Form 'Page X of Y' Manually
    1. On the View menu, click Header and Footer.
    2. Click the Show Next and Switch Between Header and Footer buttons to move to the header or footer in a desired section, and then position the insertion point in the appropriate location where you want the page numbers to appear.
    3. Type the word "Page" and then press the SPACEBAR once.
    4. On the Header and Footer toolbar, click the Insert Page Number button, and then press the SPACEBAR once.
    5. Type the word "of" and then press the SPACEBAR once.
    6. On the Header and Footer toolbar, click the Insert Number of Pages button.
    7. Click the Close button on the Header and Footer toolbar to return to the document.


    Changing the Page Number Format
    While numbering pages, Word allows you to easily customize the page numbers in various ways. You have the choice of using one or more page number formats such as Roman Figures (i, ii, iii, ...), Arabic Numerals (1, 2, 3, ...) or Letters (A, B, C,..., or a, b, c, ...) throughout or in different sections in a document.

    Fig: Pages with different number formats


    To change the page number format from the default 1, 2, 3,... to a different numbering format, here are the steps to follow:
    1. Position the insertion point in the section you want to change its page number format.
    2. On the Insert menu, click Page Numbers.
      The Page Numbers dialog box is displayed.
    3. Click the Format button in the Page Numbers dialog box.
      The Page Number Format dialog box is displayed. 
    4. Fig: Page Number Format dialog box showing number formats
    5. In the Number Format drop-down list, click the format you want for page numbers.
    6. Click OK to close the Page Number Format dialog box.
    7. Click OK to apply your settings.


    How to Change the Appearance of a Page Number
    Page numbers are printed in the header or footer and can be formatted as you would any text in the main document. You can change the font, color, font size, etc, of a page number by selecting it and then choosing commands on the Formatting toolbar or in the Font dialog box. Here are the steps you should follow to change the appearance of a page number in a document.
    1. On the View menu, click Header and Footer.
    2. If you inserted the page number in the footer, click the Switch Between Header and Footer button on the Header and Footer toolbar to move to the footer area.
    3. Do one of the following:
      • If you inserted page numbers using the Insert Page Number button on the Header and Footer toolbar
        1. Select a page number.
        2. On the Formatting toolbar, click the formatting buttons (such as Font, Font Size, Bold, Underline, Italic, Font Color) you want.
          To choose more formatting options, click Font on the Format menu, and then select the options you want in the Font dialog box.
      • If you inserted page numbers using the Page Numbers command on the Insert menu
        1. Click the page number.
          A frame appears around the number.
        2. Move the pointer over the frame and then click when the pointer becomes a four-headed arrow.
          You will see eight small black squares appearing on the frame's border.
        3. Click the formatting buttons you want on the Formatting toolbar.
          Alternatively, click Font on the Format menu to apply more options in the Font dialog box.
    4. Click Close on the Header and Footer toolbar.


    Including a Chapter Number in a Page Number
    Word allows you to create a header or footer which describes a page more by including a chapter number as well as a page number. You can do this while inserting page numbers.

    Please note that before you can successfully have Word print a chapter number of a document along with the page number, you must have formatted chapter headings with one of the nine built-in heading styles in Word, and this heading style must never be used anywhere else in the document.


    How to Include a Chapter Number in a Page Number
    1. If you have already formatted the document chapter headings with one of the heading styles that come with Word, proceed to step 2 below; else, follow these steps to format the headings with one of the heading styles that come with Word.

      1. On the Format menu, click Bullets and Numbering.
        The Bullets and Numbering dialog box is displayed.
      2. Click the Outline Numbered tab.
      3. Click a chapter-numbering style that includes the text "Heading 1," "Heading 2," and so on. 
      4. Click OK.
      5. Type the text you want for the numbered heading, and then press ENTER.
      6. Click the Styles and Formatting button at the extreme left of the Formatting toolbar, to display the Styles and Formatting task pane.
      7. To add the next numbered heading, select the heading text, and then click the style name (e.g, 1. Heading 1) in the Styles and Formatting task pane.
      8. Fig: Using the task pane to format a chapter title with a heading style
        NOTE
        • The style name you click must be the same as the one you clicked in the Bullets and Numbering dialog box. 
        • Also, do not forget to insert a Next Page, Even Page or Odd page section break at the beginning of each chapter title text.

    2. Select the section(s) in which you want to include chapter numbers along with page numbers. 
    3. On the Insert menu, click Page Numbers.
      The Page Numbers dialog box is displayed.
    4. Click the Format button.
      The Page Number Format dialog box is displayed.
    5. Click the Include chapter number check box.
    6. In the Chapter starts with style box, click the heading style applied to the chapter titles in your document.
    7. In the Use separator box, click the separator character you want between the chapter and page number.
    8. Click OK to close the Page Number Format dialog box.
    9. Click OK to close the Page Numbers dialog box and apply your settings.


    How to Hide the Page Number on the First Page of a Document or Section
    1. Position the insertion in the section you want to hide the page number on its first page.
    2. On the Insert menu, click Page Numbers.
      The Page Numbers dialog box appears.
    3. Clear the Show number on first page check box.
    4. Click OK.

    TIPS:
    • To hide the page number on the first page of each section of a document containing several sections, you need to follow step 1 through 4 above for individual section concerned.
    • You will have to manually delete from a header or footer the page number you used the Insert Page Number button on the Header and Footer toolbar to insert in a First Page Header or First Page footer.


    Numbering Pages in a Document with Several Sections
    In the post, Creating Headers and Footers (a step-by-step approach), I mentioned under the heading "The Same As Previous Button - Knowing It and How to Use It", that Word initially connects all the headers and all the footers in the document, making their  content identical; and changing the header or footer in one section leads to changing the headers or footers in all connected sections. The same rule also applies to numbering pages in a document with several sections, since page numbers are afterall inserted in the header or footer. As a result, you need to remove the connection between the headers and footers of one section and the ones preceding it before you can successfully change page numbering for that section.

    How to Change the Page Number in Different Sections
    1. Make sure the document has already been divided into sections.
    2. Position the insertion point in the section you want to change page numbers for.
    3. On the View menu, click Header and Footer.
      The Header and Footer toolbar is displayed.
    4. On the Header and Footer toolbar, click the Same As Previous button to disconnect headers or footers in the current section from the headers or footers preceding it.
    5. If the header or footer already contains a page number, select it and then press BACKSPACE or DELETE to remove it.
    6. On the Insert menu, click Page Numbers.
      The Page Numbers dialog box appears.
    7. Select the options you want, and click OK.
    8. Click the Close button on the Header and Footer toolbar when you are through.


    How to Change the Starting Page Number in a Section
    1. Position the insertion point in the the section whose starting page number you want to change.
    2. On the Insert menu, click Page Numbers.
      The Page Numbers dialog box is displayed.
    3. Click the Format button.
      The Page Number Format dialog box is displayed.
    4. In the Start at box, under Page Numbering, enter the page number you want to appear on the first page of the selected section.
    5. Click the OK button in the Page Number Format dialog box.
    6. Click the OK button on the Page Numbers dialog box to apply your settings.


    Starting Page Numbering on a Page Other Than the First Page
    To start page numbering on a page other than the first page, your document must already contain more than one section. If you do not know how to divide a document into sections, see the post  on dividing a document into sections, for information. If your document has not been divided into sections, however, you can quickly insert a section break to divide the document into two sections to enable you perform this special page numbering task. How? Do it like this: (i) Position the insertion point at the beginning of the page where you want to start numbering. (ii) On the Insert menu, click Break. (iii) In the Break dialog box, under Section break types, click Next page, and then click OK. With these steps, your document now contains two sections and is ready to enable you start page numbering on a page other than the first page. With your document now containing more than one section, do the following to start page numbering on a page other than the first page
    1. Position the insertion point at the beginning of the section in which you want page numbering to start.
    2. On the View menu, click Header and Footer.
      The Header and Footer toolbar is displayed.
    3. On the Header and Footer toolbar, click the Same As Previous button to disconnect the headers and footers in the current section from the preceding section.
    4. Do one of the following:
      • Position the cursor in the header or footer where you want the page number to appear and then click the Insert Page Number button on the Header and Footer toolbar, to quickly insert a page number.
      • To specify more page numbering options, do the following:
        1. On the Insert menu, click Page Numbers.
          The Page Numbers dialog box is displayed.
        2. Select the options you want in the Position and Alignment boxes.
        3. Click the Format button.
          The Page Number Format dialog box appears.
        4. Under Page Numbering, click the Start at radio button, and then select other options you want in the dialog box.
        5. Click OK to close the Page Number Format dialog box, and then click the OK button on the Page Numbers dialog box to apply your settings.
    5. Click the Close button on the Header and Footer toolbar to return to the document.


    Display a Graphic Behind a Page Number
    To add beauty to your document, you can display a picture or graphic behind, beside or around page numbers. The simple steps to display a graphic, such as an AutoShape, behind a page number are highlighted below.
    1. Select the graphic you want to display behind the page numbers, and click Copy on the Edit menu.
    2. On the View menu, click Header and Footer, and then click the Switch Between Header and Footer button to move to the footer, if you inserted the page number at the bottom of the page.
    3. Click Paste on the Edit menu to paste the graphic into the header or footer.
    4. Drag the pasted graphic over the page number.
    5. With the graphic still selected, click Draw on the Drawing toolbar, point to Order, and then click Send Behind Text.
      The graphic now appears behind the page number. 
    6. Holding down the ALT key, click and drag the graphic to position it properly behind the page number.
    7. Click the Close button on the Header and Footer toolbar when you are through.


    Fig: Pages showing page numbers displayed above and in-between graphics


    To Remove Page Numbers
    To insert page numbers is technical: but to remove page numbers is way pretty easy. Here are the steps to remove page numbers from a document.
    1. Position the insertion point in the section that you want to remove page numbers from.
    2. On the View menu, click Header and Footer.
      The Header and Footer toolbar appears.
    3. Do one of the following:
      • To delete page numbers inserted using the Insert Page Number button, select a page number and then press either BACKSPACE or DELETE.
      • To delete page numbers inserted using the Page Numbers command on the Insert menu
        1. Click the page number.
          A frame appears around the number.
        2. Move the pointer over the frame's border until the pointer becomes a four-headed arrow, and then click (the frame's border).
          You will see eight small black squares appearing on the frame's border. These are called sizing handles.
        3. Press DELETE or BACKSPACE. 
    4. Click the Close button on the Header and Footer toolbar.
    NOTE:
    • A document can contain only one or multiple sections.
    • In the case of a document with only one section, Word removes page numbers in the entire document on performing step 3 above.
    • In the case of a document with several sections in which you have disconnected the headers or footers in different sections, Word removes only the page numbers in the current section, on performing step 3 above.
    • Even if the document is divided into sections, but you did not break the connection between the headers or footers in different sections, Word still removes page numbers from the entire document on performing step 3 above.
    • If the current section contains first-page or even or odd page headers and footers, remove page numbers from all headers and footers.


    Numbering Lines
    Though not necessarily done or commonly found in printed documents, you can easily number every line in your document, like you add bullets and numbering to paragraphs in Word. Line numbering makes it easier to
    refer to specific lines in a document, such as a script. Lines in tables, frames, footnotes, endnotes, or  headers and footers are not included when lines are numbered in Word. When you add line numbers to a document, Word prints, in the left margin or between columns, numbers sequentially corresponding to each or specific lines in the document. These line numbers can be printed on paper alongside the main document text, but you can view them on screen only in Print Layout view or Print Preview.
    To add line numbers, do the following:
    1. Start with one of the following options:
      • If you have not divided the document into sections, just position the insertion point anywhere in the document, but not in a table, frame, footnote, endnote, or header or footer.
      • If you have already divided the document into sections, position the insertion point in the section in which you want the lines to be numbered.
      • If the document has been divided into sections, but you want to add line numbers to the entire document, select the entire document by clicking Select All from the Edit menu, or pressing CTRL + A on the keyboard.
    2. On the File menu, click Page Setup.
      The Page Setup dialog box is displayed.
    3. Click the Layout tab, and then click the Line numbers button.
      The Line Numbers dialog box appears.
    4. Fig: Line Numbers dialog box
    5. Click the Add line numbering check box.
    6. Do one or more of the following:
      • If you want to begin line numbering with a number other than 1, type or choose the line number you like in the Start at box.
      • To define a distance between the number and the text, type or choose a measurement in the From text box.
      • To display line numbers for every nth line, type or choose the incremental value in the Count by box. Example, type or select 10 in the Count by box to have Word number every tenth line.
    7. Under Numbering, select an option (e.g. Restart each section), to specify where you want Word to restart line numbering.
    8. Click the OK button on the Line Numbers dialog box.
    9. Click the OK button on the Page Setup dialog box.
    Fig: Every line numbered...................,,,,,,..........................Fig: Every 5th line numbered


    To Remove Line Numbers
    1. Position the insertion point in the section or select the sections from which you want line numbering removed.
    2. On the File menu, click Page Setup.
      The Page Setup dialog box appears.
    3. Click the Layout tab, and then click the Line Numbers button.
      The Line Numbers dialog box is displayed.
    4. Clear the check mark in the Add line numbers check box by clicking it.
    5. Click the OK button on the Line Numbers dialog box.
    6. Click the OK button on the Page Setup dialog box.


    How to Suppress Line Numbers for Selected Paragraphs
    If you want Word to omit line numbers for certain paragraphs and then continue from subsequent paragraphs, you can easily do it in Word by suppressing line numbers for such paragraphs. Here are the steps you need to follow to suppress line numbers for selected paragraphs.
    1. Select the paragraphs you want to remove line numbering from.
    2. On the Format menu, click Paragraph.
      The Paragraph dialog box is displayed.
    3. Fig: Suppressing line numbers using the Paragraph dialog box
    4. Click the Line and Page Breaks tab.
    5. Click the Suppress line numbers check box.
    6. Click OK.
    Fig: Line numbers suppressed for selected paragraphs


    Aligning Text Vertically on a Page
    Not only does Microsoft Word enable you to align (flush) page contents horizontally (left, center, right, or justified) on a page, it also enables you to perform vertical alignment for a page content.  Aligning text vertically on a page is best suited for a document with a single page with partial text, such as a title page or dedication page, or the page on which you write the copyright and publisher's information. You cannot single out a particular page in a multiple-page section or multiple-page document with one section and align its content vertically on the page. If you do that, the formatting will be applied to all the pages in that section or single-section document. To single out a particular page in a multiple-page section or document and align its content vertically on the page, you must first of all create a separate section for the desired page by inserting a section break at the beginning or end (or both, if its not the first or last page in the section or document) of the page.

    There are four vertical alignment options you can choose from: Top, Center, Justified and Bottom, - each of which distinctly determines how Word aligns a partial page of text between the top and bottom margins.

    Here are the steps to align text vertically on a page:
    1. Position the insertion point in the page or section containing the content you want to align vertically on the page.
    2. On the File menu, click Page Setup.
      The Page Setup dialog box appears.
    3. Click the Layout tab.
    4. In the Vertical alignment box, under Page, click the alignment option you want.
      Fig: Page Setup dialog box showing page vertical alignment options

      TOCLICK

      Align the top of the first paragraph with the top margin.aTop
      Align the contents of the page midway between the top and bottom margins.aCenter
      Spread the paragraphs evenly between the top and bottom margins, with the top of the first paragraph aligned with the top margin, and the bottom of the last paragraph aligned with the bottom margin.aJustified
      Align the bottom of the last paragraph with the bottom margin.aBottom

    5. Select an appropriate option in the Apply to box, and then click OK.
    Fig: Images of texts aligned vertically on page


    RELATED POSTS